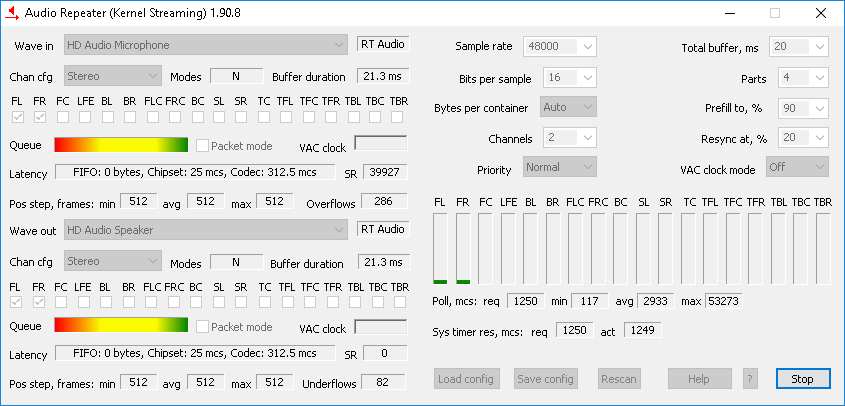
Usage
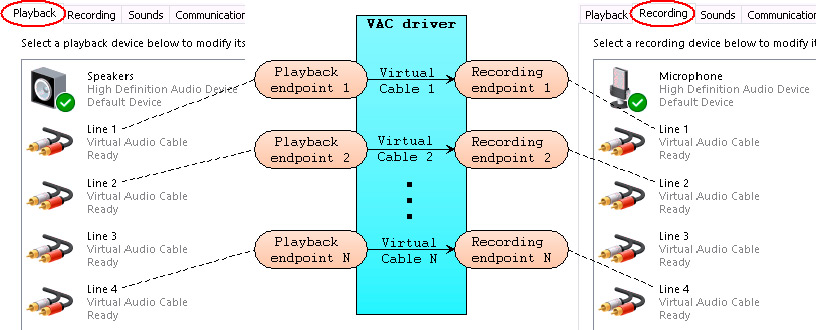
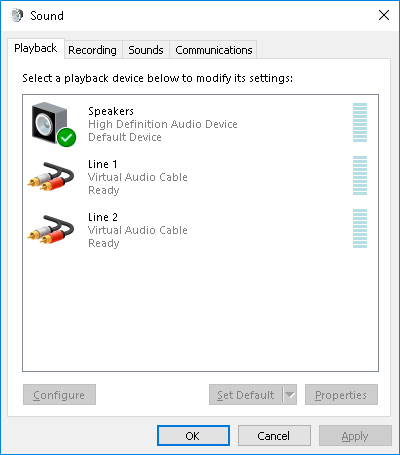
After successful installation, you will see new "Line N (Virtual Audio Cable)" endpoints in sound playback/recording properties:
By default, a single Virtual Cable is created (only "Line 1" endpoints are present). You can create more Virtual Cables with VAC Control Panel.
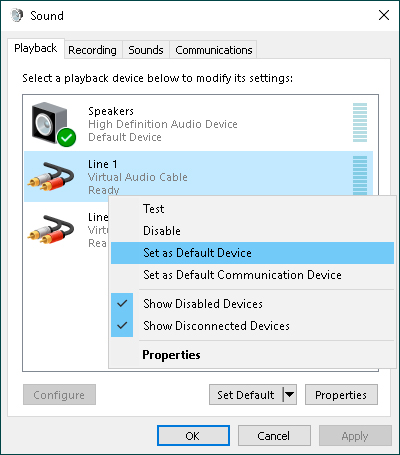
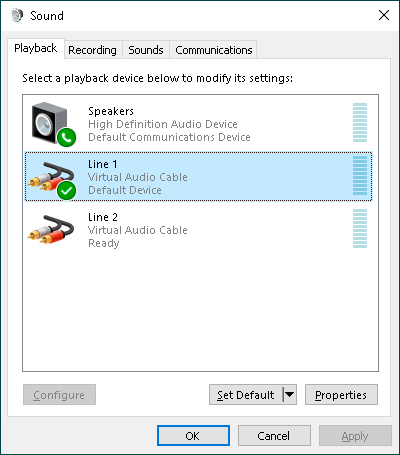
Due to Windows audio device installation policies, newly installed Virtual Cable endpoint may be automatically set as default. It causes all system sounds to be routed to it. For you, it looks as disappearance of all system sounds. Don't worry, just open Windows audio properties window, and set your favorite hardware endpoint/device as default.
Now you can select any of these endpoints in audio application's settings. If the application does not allow to specify audio source/destination explicitly, you can set any of VAC endpoints as a default.
Example 1: recording sounds from a browser
To record a sound from a web page (for example, a song, web radio translation, etc.), perform the following steps:
1. Check if your browser allows to explicitly specify audio playback device (endpoint) to play sounds. Most browsers don't, so set playback endpoint of any Virtual Cable as a default playback device.
2. After that, you will not hear sounds played back by the browser, because all of them are directed to the first Virtual Cable, but not routed further. To hear them, you need to configure sound monitoring with either Audio Repeater or Listen feature. The difference is that in first case the monitoring will be stopped as you stop or close Audio Repeater, but in second case you need to turn the Listen feature off manually.
3. Now you should hear all browser sounds again, possibly with a slight delay due to the intermediate buffering.
4. Start any audio recording software (for example, Free Audio Recorder, Audacity, Wavosaur).
5. In audio source settings, select "Line N" device/endpoint with the same number as used for playback.
6. Start recording.
7. Start playback in the browser.
8. As the audio piece ends, stop recording and save recorded data to a file.
9. If Listen feature is used for monitoring, don't forget to turn it off if no more needed.
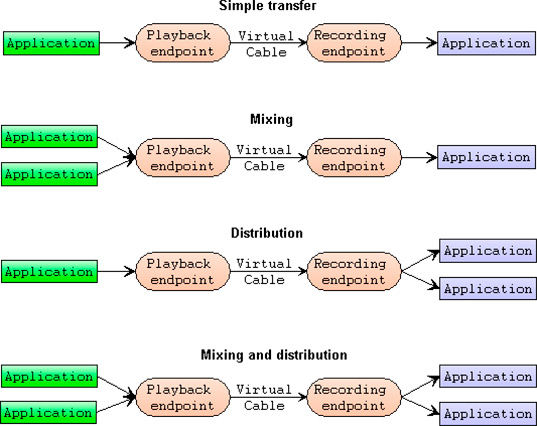
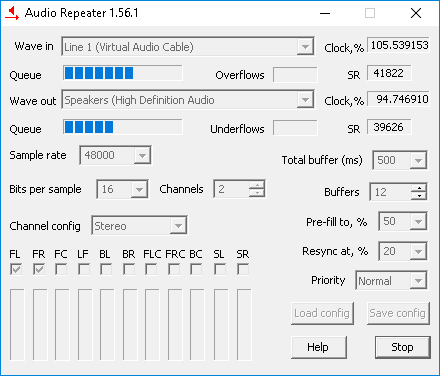
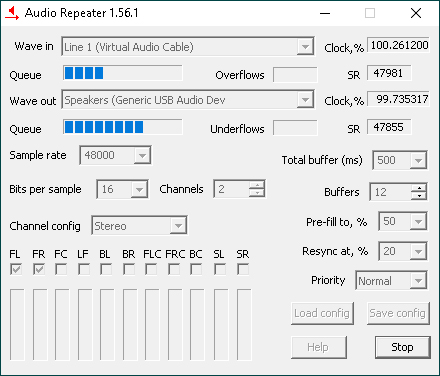
Example 2: sharing a sound among multiple devices
1. Perform first steps of this example, configuring a playing application (a browser, a player etc.) to play sounds to Virtual Cable 1.
2. Start first Audio Repeater instance to copy sounds from Virtual Cable 1 to the first device.
3. Instead of configuring a recording application, start a second Audio Repeater instance to copy the same audio stream to the second device:
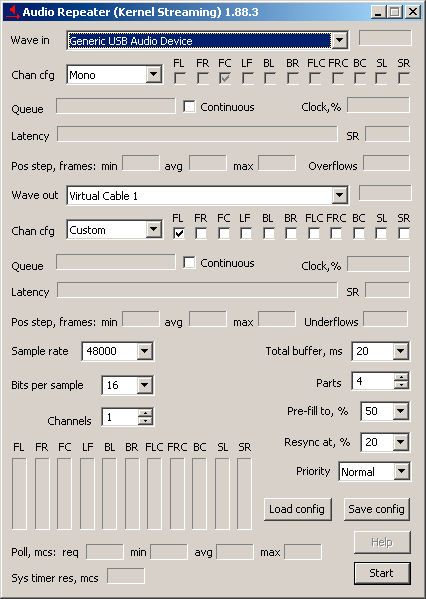
Example 3: packing microphone signals
To pack signals from two microphones into left and right channels of a single stream:
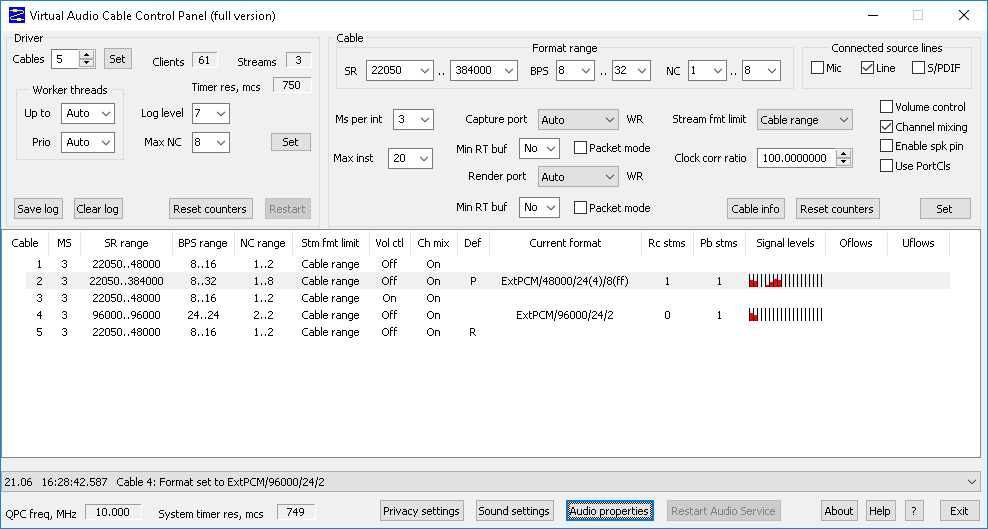
1. In VAC Control Panel, choose a Virtual Cable and configure its format range to accept a stereo (two-channel) stream. Make sure that the Enable channel mixing checkbox is cleared and "Ch mix" is "off" (channel mixing is disabled). Leave Control Panel open to watch cable signals.
2. Set default format for the recording endpoint to "stereo", with desired sampling rate and bitness.
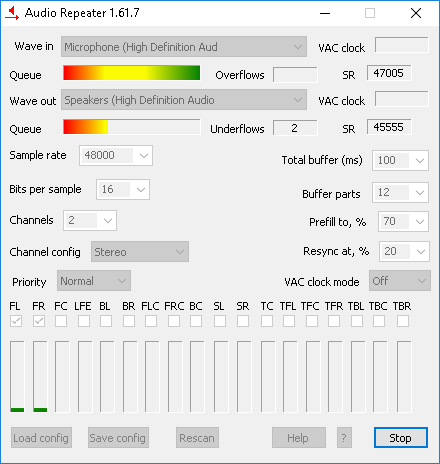
3. Run two instances of Kernel Streaming version of Audio Repeater. In each of them, choose the appropriate microphone pin as "Wave In", and leave "Wave Out" to be "None". Set input/recording channel configuration to "Mono".
4. Try to start each repeater to make sure that both microphone pins support selected sampling rate and bitness. If the repeater shown an error message related to unsupported format, correct sampling rate and/or bitness, and try again. If the microphone pin does not support mono (single-channel) formats, it cannot be used for such task.
5. If both repeaters are successfully started, speak into each microphone to make sure that the appropriate signal indicator moves, and stop them.
6. In both repeaters, choose the same Virtual Cable as "Wave Out", and set output channel configuration to "Custom". In first repeater, check the "FL" output box; in the second, check the "FR" box. Only a single channel should be checked in each repeater. Set number of channels to 1 in both repeaters.
7. Start recording/processing application (for example, Audacity) and choose the appropriate "Line N" recording endpoint (if possible, use WASAPI interface). Configure the application to record a stereo stream.
8. Start recording and make sure that VAC Control Panel shows that current audio format is stereo.
9. Start both repeaters, speak into microphones and check that the appropriate signal level indicators in VAC Control Panel are moving. If the recording/processing application has such indicators, they should move too.
Instead of microphones, you can use any other audio recording devices, or even signals produced by other applications, passing them via additional Virtual Cables. You can pack up to 8 signals by default, and up to 32 maximum. Just configure the appropriate formats for Virtual Cable, and run a separate Audio Repeater instance for each signal.
System requirements
VAC system requirements are very simple:
- Any hardware configuration (CPU, memory size etc.) enough for Windows OS.
- Microsoft Windows 5.x or later 32-bit or 64-bit operating system.
- For a virtualized environment, please see compatibility issues.
- For a remote connection, please see compatibility issues.
But these requirements are enough only to run VAC and get it working in basic audio setups, like recording audio streams coming from web pages. To have stable and low-latency audio streaming, your system must meet real-time performance requirements.
If you experience signal distortions while operating with real-time audio streams, it is strongly recommended to check your system for real-time audio streaming suitability, and perform a tuning if necessary.
How to install
VAC package is distributed as a ZIP archive. Simply unpack it into an empty folder, run setup.exe application and follow the instructions displayed. If you use VAC for the first time, please read the readme.txt and vac.chm files before installation. If you have already installed previous version of VAC 4, don't forget to uninstall it before installation.
Source code and other options
VAC is a WDM driver miniport written entirely in MS C++ using object-oriented technology. No external assembly files or additional driver development tools like VtoolsD are used.
VAC also supports a custom (proprietary) version creation to be used together with a particular application only. Each of custom versions has an unique key to identify its "native" application. This "native" application uses a special way to open the driver. Such opening way is called a "open in the native mode". When the driver is opened in native mode, it transfers audio signal without any limitations. If not, it adds a noise to the signal to prevent unauthorized usage.
Please note that custom version of VAC has the same functionality as the common version. Customization includes only unique names and unique key, not additional custom functionality.
To purchase VAC sources, custom version and multiply license,
contact us.
For support of older Windows releases, please visit
Virtual Audio Cable 3.12 page.